Request for Access to Links

There was a recent update that has caused my Google Doc links to stop working. Please send me a request for access to the files until I can get them up and running again. I will grant you access through the email as soon as I am able to, thank you!

11.30.2010

Featuring: Christmas Countdown Frame

Can you believe that today is the last day of November?  With tomorrow being the first day of December, I'm wondering, do you use a countdown calendar to mark the days until Christmas?   There are so many ways you can make one, some designs are more difficult than others.  Tiffany at Lemon Tree Creations had this fabulous idea for a countdown calendar frame...
 

What I love about this calendar is how simple it is to make.  Most of the items needed could be found around the house.  Tiffany shows here in detail how she made it and includes how she came up with the idea to use flashcards!   Also, it would be so easy to change out the tag and use different flash cards to count down to any special occasion.   Go take a look. :)
 
My thanks to Tiffany for allowing me to share her idea with you today!
 
Today's Fabulous Find...Christmas Countdown Frame! 
 
Pin It!

11.29.2010

Christmas Subway Art Printables

Did you have a nice Thanksgiving?  Are you ready for Christmas?  I have a little something to share that might help you along with your holiday decorating...and once again, it's one of my favorite things to hear...It's Free!!!
Christmas Subway Art

Please excuse the poor image quality, a new camera is on it's way!


You are welcome to download the prints as much as you like, I just ask that you use the prints for personal use only.  Thanks!
I'm planning to make a winter print for after Christmas as well, if you're interested check back, or follow Today's Fabulous Finds, so you don't miss out. :)

I had so much fun finding colors that I just kept adding them!  There are nine colors! 
I included two prints with the look of a textured background. 

Not Pictured:  Multi-colored Print and  Red

To print them:

Click on the print you want to use, to open it into a full screen.

Then either..

1. Right click on copy to copy and paste it into a document,

or

2. Right click on save picture as to save it as an image.

(I just print it onto white card stock.)
The prints were made to fit an 8x10 frame, but can be stretched to fit other sizes as well.  To size them, copy and paste the print to an editing program (ex. Microsoft Publisher, Photoshop) then use the side rulers to make it the size that you want.  The print pictured above is a 5 x 7.

Edited to Add: 
I've added another post with a new version of the Christmas Subway Art with one change.  I've replaced 'manger' with 'magical'. 
 
 
Without noticing that the 'm' is placed sideways on the word 'manger' it could be read as 'anger', which most definitely wasn't my intention when I put it together.  Please choose whichever version you like best, it's all in how you look at it. :)  Click here to print the new version, all 10 colors are available.


EDITED TO ADD:  This print has been added especially for Pink Princess (see comments) and any other lovers of pink.  :)


If you use the Christmas Subway Art Print and post about it, I'd love for you to leave a link to your post in a comment so we can all check it out and get some fun ideas of how to display it.

Today's Fabulous Find...{free}Christmas Subway Art!

This post is linked to some fun parties filled with really great ideas.  Please link to them from my side bar and take a look!

Pin It!

11.27.2010

Teacher Gift: Paint Stick Magnets

First, before I do anything else, I want to say thank you!  Thanks for your very kind comments, for your excitement about the ornament download, and for following Today's Fabulous Finds!  I've really enjoyed reading your reactions to the paint stick ornaments.  I think many of you are just as excited about them as I am...I love it!~Okay, moving on...one more paint stick project and then I promise I'm done, anyway for now. :) 

I mentioned that the ornaments could be used as teacher gifts.  My sister gets the credit for this idea.  She made the paint sticks into magnets and added these prints that she put together herself, aren't they so fun?   She made them for a first grade teacher, if you don't have a first grader you could make one up for whatever grade.  You are welcome to use her prints, or use them as inspiration to create your own.


Directions:
  • Copy and paste the image into a document.
  • Size it to 7 1/2" wide x 2 1/2" tall.
  • Print it onto white card stock.
  • Because the prints are in color, you can skip the step in the tutorial to copy them with a copy machine.  Color prints tend to not run if they don't have a lot of black with them.  Make sure you use an even, thin coat of Mod Podge and be careful not to run your brush over it too many times.
  • Follow the tutorial for the Paint Stick Ornaments, but instead of adding a wire, cut a strip of wide magnet tape for the back.  (The magnet tape tends to curl up and peel off after awhile, so it is a good idea to also use some hot glue, or another strong glue, to attach it.)
  • Bundle the magnets together with jute or a ribbon and add a card.
I made these magnets and took a picture of them to show you, but the picture quality is terrible (I'm still using my video camera for photos, but a new camera is on it's way!).  I'll add a picture as soon as I can so you can see the finished look.  Edited to add:  Here's a picture.

Today's Fabulous Find...Paint Stick Teacher Magnets
Have you entered the giveaway to win 
12 of the Paint Stick Christmas Tree Ornaments? 
 Click here to enter
The Giveaway ends December 1st, 11pm MST.

Pin It!

11.25.2010

Paint Stick Snowman {Tutorial}

After I cut the paint sticks down to make the Printable Christmas Tree Ornaments I was left with a bunch of tops.  Wanting to find a fun use for them, I decided to make them into little snowmen and a 'snowgirl' too! 


The snowmen are pretty simple to make, my two youngest kids each made one.  They picked out their own fabric, painted them, and drew the faces on by themselves.  My son thought it would be fun to color his green. :)  I helped with hot gluing the hat and scarf on.  We glued magnets on the back of them so they can use them to hang up the pictures they draw. 

(I apologize for the poor picture quality in this post, they were taken with my video camera.)

How to make a paint stick snowman...
  1. Cut a paint stick top to 4" long and paint it ivory or white.  Add brown paint on the edges, see step 4.  (There's no need to round the top of the stick, I sanded this one at the experimental stage of the design.) 
  2. Cut a strip of fabric for the scarf and a rectangle piece for the hat. (I used fabric scraps from other projects.)
  3. Turn the rectangle up at the bottom, put some glue on the paint stick at the bottom of the hat, and wrap the fabric around to the back and overlap it.  Hot glue the overlap shut.  Tie a piece of jute in a knot around the top of the hat. Wrap a piece of wire (or a ribbon) around the top of the hat, twist it in the back and then pull the loop up for the hanger. 
  4. Use a fine tip sharpie marker to draw the face on.  (I ran a google search on snowmen clip-art to get some ideas of how to draw the faces.)  I used paint on a rag for the rosy cheeks and the nose.  Put a thin piece of fabric over your finger, dip it in paint, blot it until it's nearly dry and then gently rub the paint on for the cheeks.  Add some dark brown on the edges of the snowman using this same method. 
You can use an orange marker to color in the carrot nose.


 This one makes me smile!   The hat turned out so poofy. 


And here we have the 'snowgirl'.  She's my favorite. 


The little berries and curly twigs were part of a wall hanging, I just 'borrowed' a few.  The burlap is from a 2 yard piece that I bought several months ago..it's the burlap that just keeps on giving.  I've used it on a lot of projects and still have a large piece left.  It's hard to go wrong with burlap...and it's so cheap too!

Today's Fabulous Find...Paint Stick Snowmangirl!


Have a wonderful Thanksgiving!!!


What?!?  This is different! 


Pin It!

11.24.2010

Featuring: Fall Trees

Are you scrambling to make your last minute preparations for Thanksgiving?  Maybe you're wishing you had a little something special to set out that was quick and easy to put together, yet would still make a big impression.  If you are, then go take a walk in your yard, you might just get inspired!  Erin at Crafts and Sutch found inspiration and created this fun Fall Tree.


Here's what I find fabulous about her fall tree
 
It's pretty.
{love the bead accents}


It's not expensive.
{branches are free!}
 
It would make a nice (last minute) table centerpiece for Thanksgiving dinner.
{my kids could make it}
 
 When I was done with it, I wouldn't have to find a place to store it!   
{just throw the branch away and cut a new one next year}
 
It could be used as a "Thankful Tree".
{as a family you could write the things you are thankful for onto paper leaves and attatch them to the branch}
 
My thanks to Erin at Crafts and Sutch for allowing me to pass on her fabulous idea to you today!
 
Today's Fabulous Find...Falls Trees! 
 

Pin It!

11.22.2010

Printable Paint Stick Ornaments {Tutorial}

Are you looking for fun and in-expensive Christmas tree ornaments or gift tags, to make for yourself, or maybe for a neighbor or teacher gift?  If so, this might be just what you've been looking for!

There is no need for vinyl on this craft, the sayings are all printed and copied onto scrapbook paper and then Mod Podged onto...get this... a paint stick!  The best part...they cost next to nothing!  I've put a tutorial together with all of my tips and tricks.  (Don't be alarmed by the length of it, I just like details and thought you might too!)  They are really quite simple to make.


It was a light bulb sort of moment when it came to me to use 5 gallon size paint sticks to make these ornaments.  Paint sticks are the perfect thickness, the wood is already fairly smooth, and they come free (or close to it)! 


Ready to get Started?  Here's what you'll need:

Paint sticks:  The paint sticks must be the large 5 gallon sticks (nearly 1 1/2" wide).  Lowes will sometimes give them to you for free as well as Home Depot.   Home Depot sells them in bundles.  Wal-mart sells them for .28 each.  Sherwin Williams paint sticks are too narrow, so don't get them there. 
Tip:  If you ask the employee if you can buy some from them to make a craft, most often they will just give them to you for free.  Yep, FREE!


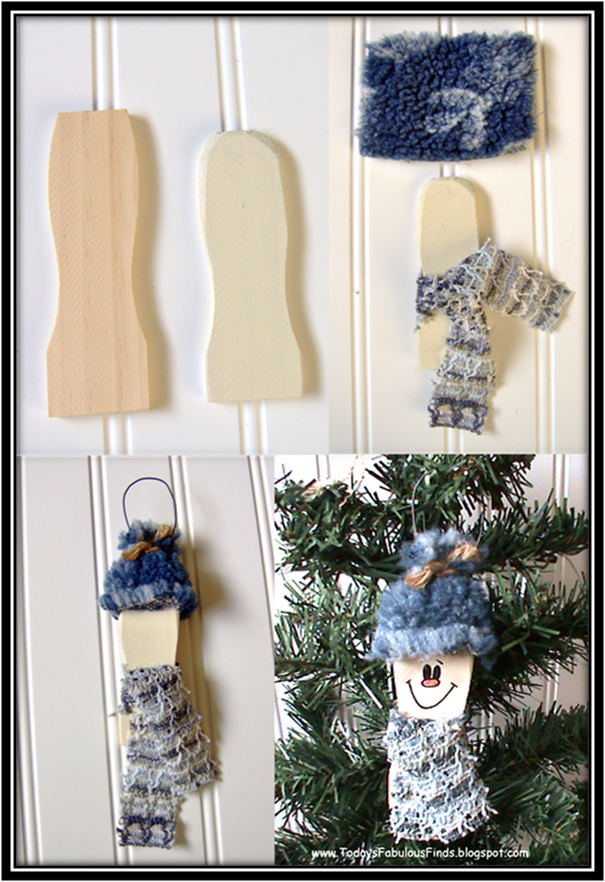
One paint stick will make 4-4" long ornaments and 1-snowman ornament
(Snowman ornament tutorial hopefully coming soon, my camera just quit on me.)
Edited to add:  Click here for the snowman tutorial.

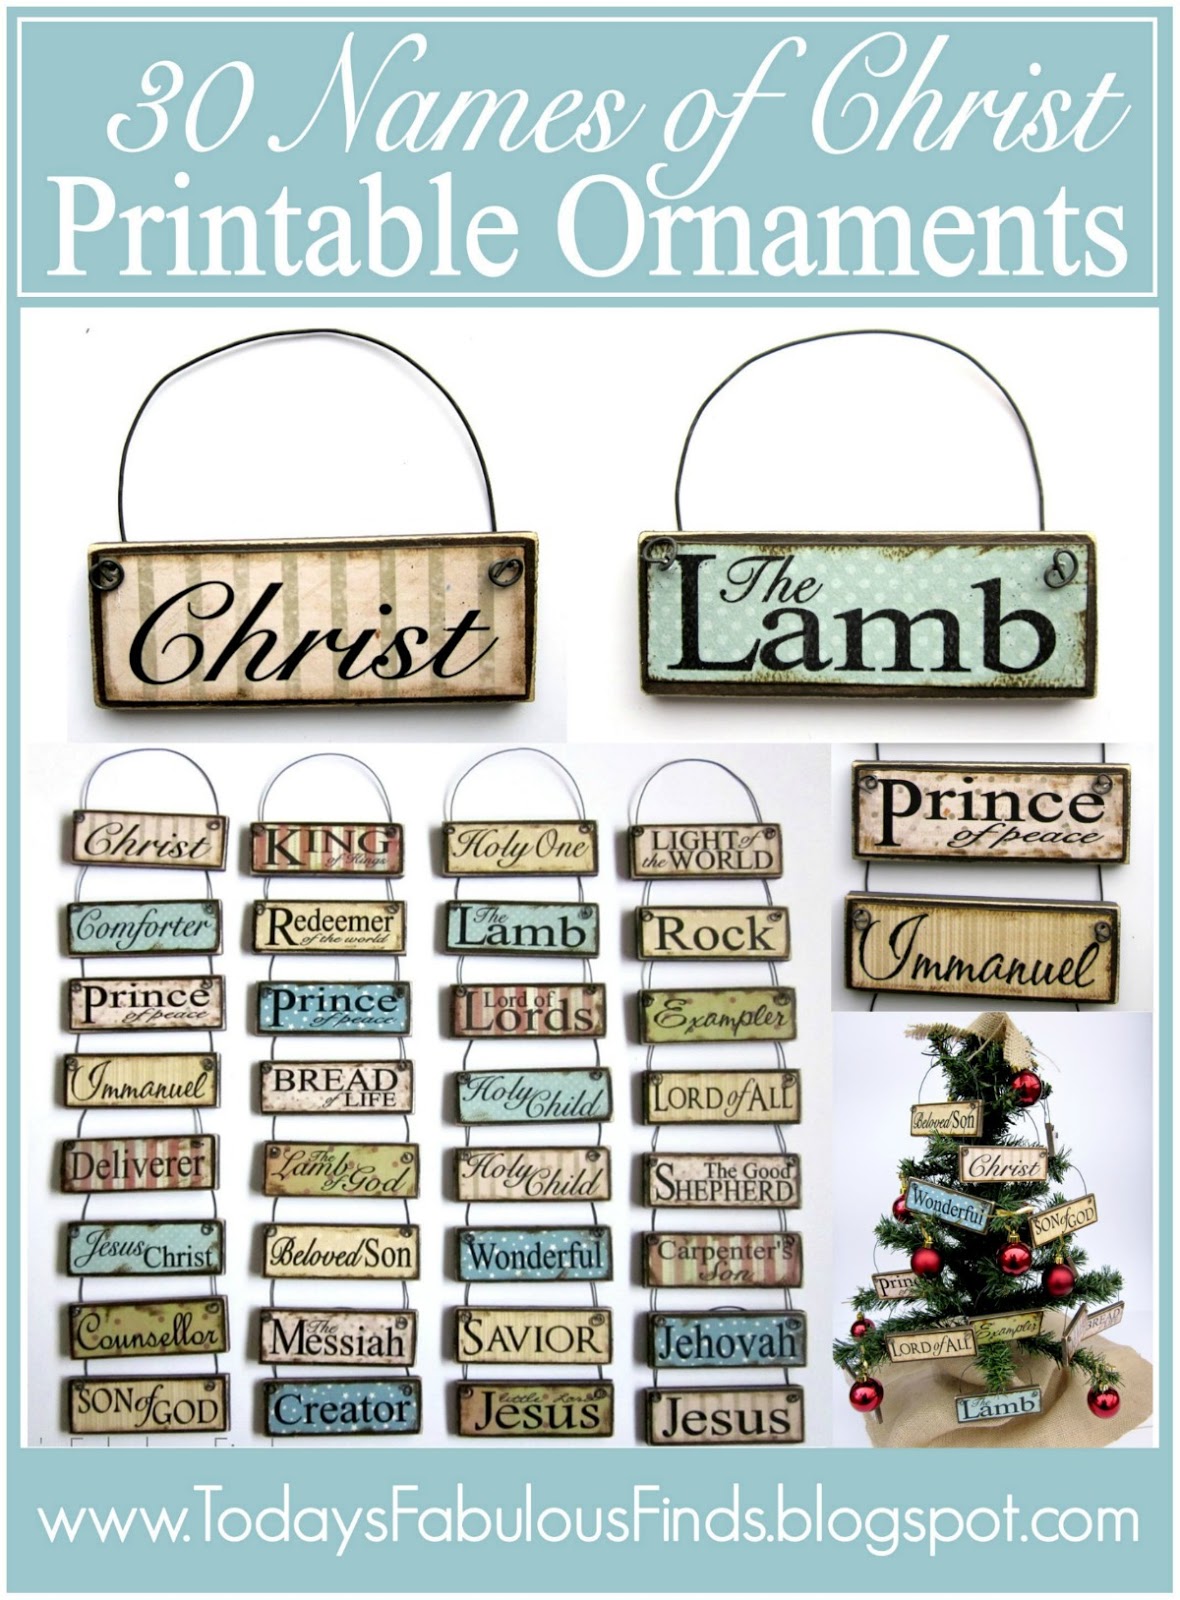
These are only 19 of the 28 Templates available

No vinyl required... Vinyl can be expensive, and not everyone has access to a craft cutter.  But don't worry, you don't need one...the sayings are printable...and I'm sharing them with you for free!   There are 28 different words/sayings to choose from

The Printable Templates are to be used 
FOR PERSONAL USE ONLY 
in your own home, church, or to give as a gift. 
They cannot be used on any items for sale or profit, this includes all fundraisors, sorry, no exceptions.

Template Example:
This is an example only, don't use this image, the quality is bad.  
*IMPORTANT:  If you are having problems downloading the templates it may be because you linked over from another site.  You need to be on the direct link to this post to be able to access the file in Google Docs.  Direct link:  http://todaysfabulousfinds.blogspot.com/2010/11/printable-paintstick-ornaments-tutorial.html.  Also, if you are using a work/school computer, your administrator may prevent you from downloading them from Google Docs, try downloading them to your personal computer if it doesn't work for you. You should'nt need to send me a Google Doc request to share them. Thanks!
  • Download the template here  (You can click on download or print.) 
  • The document includes a blank template so you can make up your own personalized sayings if you'd like. 
  • Print the templates with your home printer onto white printer paper, use the normal or high quality setting.
  • Copy the template onto scrapbook paper using a copy machine.   (Choose what paper you like, keep in mind that lighter to medium toned prints that aren't busy work best. The paper I used is from a book called Signature Suite by Jen Wilson)  This is an important step.  If you print it on an ink jet printer and don't use a copy machine to copy it to the scrapbook paper, your ink will run and blur when you Mod Podge the paper on.  ( Exception:  If you have a laser jet printer you can skip this step and print it directly onto the scrapbook paper, I've been told that the ink won't run.) 

Black Wire:  You can buy it at JoAnn Fabrics for $1.49 per roll. 

Accents (optional):  The star, heart, and snowflake rustic accents, are made by a company called Darice.  Check your local craft store.  They cost around $1.00 for a pkg. of 6-8.  The bells were $1.00 for a small bag of about 30.

  
Paint:  You can use acrylic craft paint, or spray paint them.  The color I used for this set of ornaments is Valspar's Velvet Brown spray paint.  It's the color of a Hershey's candy bar...yum!  You can choose whatever color looks good with your scrapbook paper and tree.  If you prefer a lighter color, Krylon's ivory spray paint is a good choice as well.

How to make them in 10 Steps

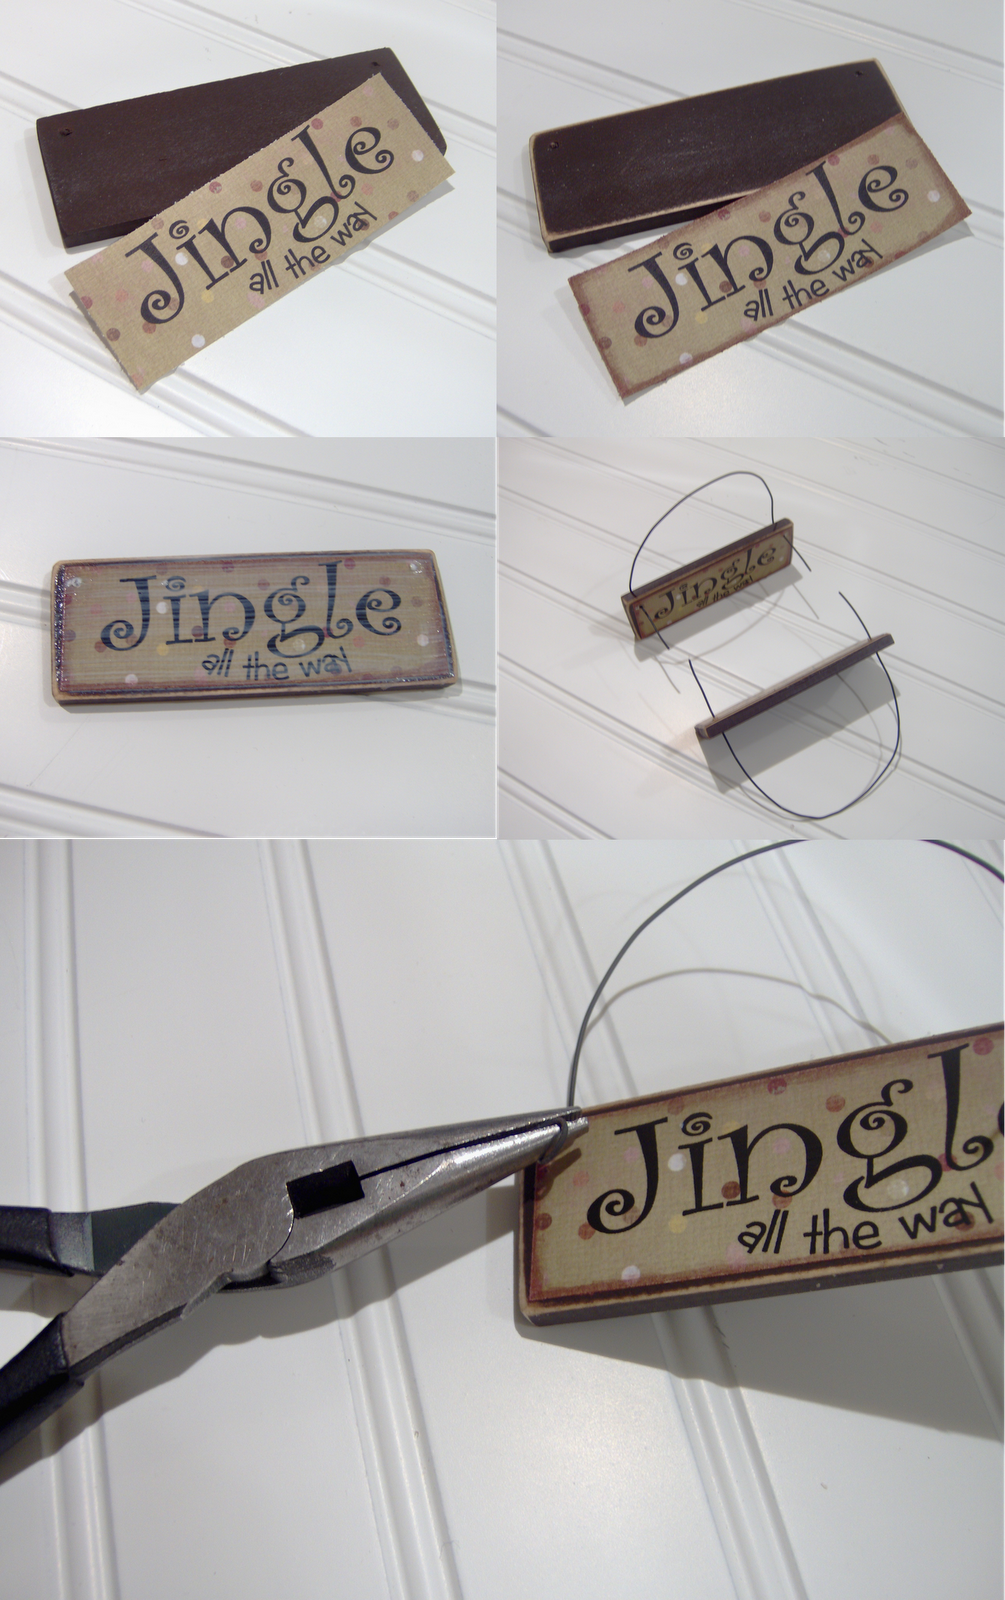
1.  Clamp the paint sticks together in bundles and mark and cut them every 4".  The best way to cut them is with a band saw, if you don't have one, you can use a jig saw, or a miter box and hand saw. 

2.  Lightly sand the sticks to smooth any rough parts (mostly the ends).


3.  Drill 2 holes in the upper corners just bigger than your wire.

4.  Paint the sticks. 

5.  Distress them by sanding the edges to expose some of the bare wood and then wipe the dust off.  (If there is writing on the stick that will show through the paint, use that side as the front, the paper will cover it.  You may need to sand the writing off of the border area a bit before you paint it if you are using a light paint color.)

6.  Cut out your print.  Make sure it is sized to the block.  (Trim to fit, if necessary, so there is about a 1/8" border of paint showing around the paper.) 

7.  To get the inked look around the edges of the paper, find a rag, put it on your finger, dip it into dark brown paint, blot most of it off, and then lightly run your finger along the edge of the paper.  You could also use a brown ink pad (I don't have one, so I improvised.).


8.  Brush a thin layer of Mod Podge onto the stick.  Place your paper on it, gently smooth it flat, and let it dry thoroughly.  Brush a thin layer of Mod Podge on top of the paper, being careful not to run your brush over it too many times and making sure the paper is flat and smooth.  Let dry.

9.  Cut a length of wire 9" long.  Gently push it through the hole in the stick from the back and through the paper about 1".  (It helps to put your finger over the hole where the wire is coming through so the paper doesn't tear.) Bend the wire up in the back.  (If you are adding an accent, put it on the wire now.)  Use needle nose pliers to twist the wire in a circle, then use the side of the pliers to push the wire down flat against the ornament.


10.  Hang them on your tree, and every time you see them, think "Wow, I made those!" :)

If you have any questions, please feel free to leave them in a comment or e-mail me.  If you make them leave me a link, I'd love to see them!

As soon as I can get to the store to buy a new camera, I'll show you how to make a snowman ornament using the top of the paint stick. :)  Edited to add:  Click here for the snowman ornaments
 

Today's Fabulous Find...Paint Stick Ornaments!


Edited to Add:  I just finished another set of Paint Stick Ornament Templates with the Names of Christ and Christlike Attributes.  Click here for the templates and for new ideas on how you can use them!


You might also be interested in:

Paint Stick Ornament Templates, Names of Christ in Latin and Hebrew

and

Paint Stick Ornament Templates, Names of Christ and Christlike Attributes in Spanish
(Added 12/1/2016)


***This post is linked to some really fun parties! 
Please link to them from my side bar and check them out!

*FYI: The Christmas Subway Art Printable is almost done and will be posted
in time to switch out your Thanksgiving print, by Monday if I can find a camera. :)

Pin It!

11.20.2010

Giveaway!!!---12 Handmade Christmas Tree Ornaments--CLOSED

Thanks for entering, this giveaway is now closed. 
 
It's Giveaway Time!!!
 

Today's Fabulous Finds has reached over 100 Followers and to show my thanks to you, I'm giving away...


~12 Handmade Christmas Tree Ornaments!~


  I realize that you can't all win this set, so I'm putting a tutorial together on how to make these ornaments (no vinyl required) and will be offering the templates to you for free! They make fun gift tags or can be made as magnets (Add a cute school saying on them for a teacher gift.).   Can you guess what I used to make them?  Hint:  The wood was free!

How to Enter:

 1. Follow Today's Fabulous Finds publicly
with Google Friend Connect
 
and then

2. Leave a comment.
(one entry per person)

That's it! 
  • Giveaway ends December 1st, 2010, 11pm MST
  • Open to U.S. residents only
  • I will e-mail the winner.  If you don't leave your e-mail, you must check back to see if you won within 2 days or I will randomly select a new winner.
 Thanks again and good luck!


Pin It!

11.18.2010

New Blog Buttons

It's taken me awhile, but I finally managed to get the buttons done to go with my new blog design.  Here is the new version if you'd like to add a new button to your blog. 


Today's Fabulous Finds

Have I  featured you on Today's Fabulous Finds?  If so, please grab a new featured button.
 
Today's Fabulous Finds

 
Pin It!

LinkWithin

Related Posts with Thumbnails