Request for Access to Links

There was a recent update that has caused my Google Doc links to stop working. Please send me a request for access to the files until I can get them up and running again. I will grant you access through the email as soon as I am able to, thank you!

4.30.2011

Hooded Bath Towel Tutorial

One of my favorite things to give for a baby gift is a nice, fluffy, hooded towel.  This is why.  I think there is almost nothing more adorable than a baby all snuggled up in a hooded towel right after their bath with their sweet little face peeking through.  When the baby is smiling it's even better!  So when I give a hooded towel...I like to think that I'm giving the parents more than just a towel, but sweet moments and memories with their baby.    


My daughter loaned me her Baby Annabell doll to use as my model so I could try to show you how the towel fits.  I'm pretty sure she thought I'd gone nuts when she saw me taking pictures of her doll in a towel!  I'm afraid that blogs can make moms do crazy things sometimes. :)


My Mom taught me how to make these hooded towels years ago and she's made them for years before that.  I've used several different styles of hooded towels, but this one has always been my favorite because of the pleats on the sides that bring the towel in snug around the baby's shoulders.


Hooded Towel Tutorial
 
 If my directions don't make sense, just look at the pictures, a picture is always better than words. 
(I wish the pictures weren't so dark, but there was a storm outside when I took them.) 


1.  You will need one bath towel and one hand towel.  If you want to make two hooded towels, you'll need to buy two bath towels and just one hand towel.

2. and 3.  Cut the hand towel in half.  (One hand towel will make two hoods.)

4.  Take one of the hand towel pieces, place it right side up, and then turn the finished edge over about 1" or so, pin and sew it in place.  If your towel is small or if you're making it for a toddler, you might want to skip this step so the hood will be deeper.   Also, if the towel has a pattern, or if you would like to have the binding on the towel on the front edge of the hood, you can cut 1" off of the cut side of the towel instead of turning the towel back in the front of the hood.


5.  Fold the left side of the towel over so the towel is in three even sections.

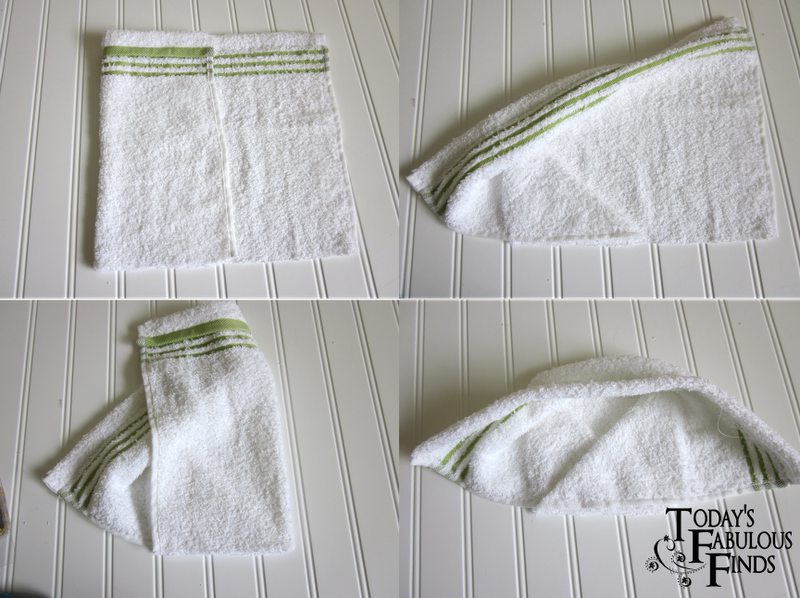
6.  Hold onto the top right corner of the side you folded over and fold it down to the left, so it makes a triangle at the bottom.

7.  Repeat with the right side.

8.  You now have a hood.  Line up the bottom edges, pin together, and sew using a 1/4" seam allowance.  Sew over it again with a serger or use a wide, close, zig zag stitch to prevent fraying.


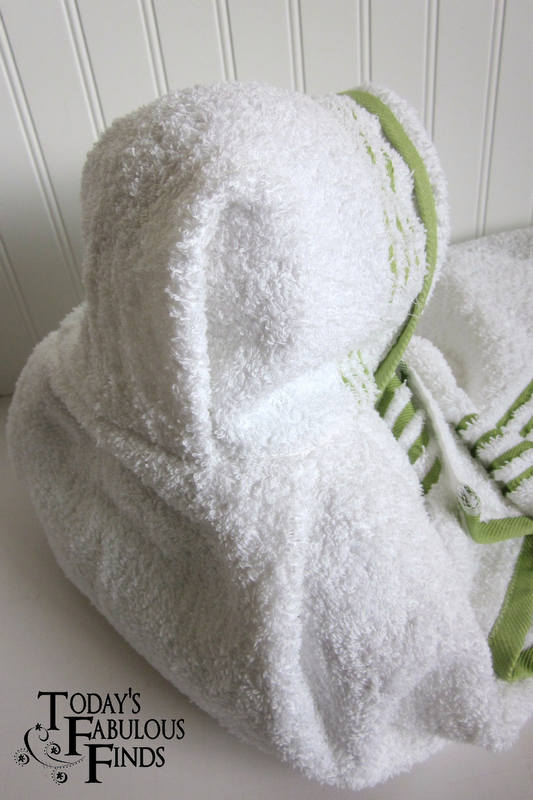
9.  Back view of the hood.

10.  Fold the bath towel in half and mark the center with a pin.

11.  Fold the hood in half and mark the center back with a pin.

12.  Lay the towel down, right side up, and then lay the hood on top of it, right sides together, matching the pins in the center.  

Pleats:  You will sew three pleats on each side of the towel (about 1" wide or so, depending on the size of your towel).  When you pin them, make sure that the folds of the pleats are all facing the center on the hood when you are looking at the inside (wrong side) of the towel.   The pleats will all fit between the folded back band on the front of the hood and the center back flat section of the hood (see back view).  There will be about 6 or 7" of towel left on each side that isn't pleated to wrap around under the baby's chin.


13.  Before you sew the pleats in, fold the hood and towel in half and make sure that both sides of the towel are the same length.

14.  Sew through all of the layers.  It will be thick, so sew slowly.  You can sew it twice to reinforce the stitching if you'd like.  (Optional) Zig-zag along the edges of the seam, through all layers, to finish the edge and hold the layers together.  Clip any frayed edges that poke through the zig-zag.

15.  Clip the threads and you're done!  You could add an applique to the towel, or embroider the baby's name on it if you'd like.

Update:  More pictures of how to fold the hood.


Sometimes, if the towel is plain, I'll sew a patterned ribbon onto the hood, in the spot where the green stripes are on this one.  The ribbon should be sewn on first thing after you cut it in half.  When you sew ribbon, sew it in the same direction on both sides to avoid puckering and turn the ends under so they won't fray.
This towel is a bit large for a newborn (I preferred the smaller terrycloth towels for newborns), but will fit a baby from around 3 months old until they are around 4 years old.


Price of a hand towel...$2.88
Price of a bath towel...$3.88
Sweet moments with baby...Priceless!
 
I hope you'll enjoy these towels as much as I have.

 Today's Fabulous Find...Hooded Baby Towel

 
I'm linking this post up to some really great parties!  Click on the links to go directly to the party.
Blogger sometimes gives me problems when I edit the HTML in my posts,
so please Click here to see the party buttons. 
 
Tip Junkie   Today's Creative Blog   Home Stories A TO Z    All Thingz Related    Ladybug Blessings
Under The Table and Dreaming     I Love Naptime   Skip To My Lou   Mad In Crafts    Dittle Dattle  
Embellishing Life   The Girl Creative   Miss Crafty Pants   Keeping It Simple  
Making The World Cuter   The DIY Showoff    Sew Much Ado    My Backyard Eden
 Seven Thirty Three   Someday Crafts   Creations By Kara   Fireflies and Jellybeans  
House of Hepworths    Beyond the Picket Fence
Pin It!

4.27.2011

Simple Beaded Bracelets

I really don't have any experience with beaded jewelry, so when my daughter wanted to make bracelets with her friends I had absolutely no clue what supplies I needed to buy, or even how to make a beaded bracelet (that is other than stringing a single strand of beads on some elastic).  I lucked out big time and found a beaded bracelet tutorial with pictures and easy directions.   I can tell you that this bracelet is simple enough that girls age 6 (with some help) and up can make them.  I had to put the clasp on for the girls, but they did all of the beading themselves.

This is the bracelet that my daughter made.  I just love the bright colors she chose!


They came up with their own original designs and not one of the girls was stressed out because it was too hard, they all had a fun time.  I think they were all done making them within 30-40 minutes.  Because this pattern uses small beads, it helps to keep the cost down.  You can even buy beads at some dollar stores.


Bracelet Tutorial at Craftideas.info

This is a great bracelet pattern for beginners.  Just turn on some music and it can be so relaxing and fun!


Today's Fabulous Find...A Simple Beaded Bracelet

Pin It!

4.25.2011

Teacher Appreciation Subway Art Prints

Teacher Appreciation week is May 2nd-6th.  My kids have some really wonderful teachers so I wanted to do a little something to show how much I appreciate them.  I designed some subway art prints for my kids teachers and for any of you who would like to use them as well.

This framed print is for a teacher who happens to love Dr. Seuss.  The students in the class can sign their names on the white border and their pictures can be added to the frame around the subway art print.


I bought the frame at Wal-mart on clearance for $4.50 (reg. $8) and then spray painted it Krylon's Bahama Sea (not the exact Dr. Seuss color, but pretty close).  The easel is from JoAnn's.  I used a $5 off coupon so I ended up buying it for only $1.  The print is an 8x8.  Total cost for the gift: $5.50.

 
*For another fun idea, you could make your child's teacher a keepsake book.  Each student in the class could draw a picture or write a letter to their teacher.  Use the subway art print for the front cover and then add a spiral binding or rings to make it into a book.

**You could also use the subway art as the front of a card.

I left white boxes in the subway art prints so that you can personalize them by adding the name of your child's teacher and an image that best fits them.  Add text and images to the prints by using Microsoft Word/Publisher or Photoshop.  The font that I used for the teacher's name is called 'Tuesday'.  It can be downloaded here at dafont.com.  I googled 'Cat in the Hat images' to find the center image.

You could also use a permanent marker and have your child write their teacher's name in the box and then have them draw or paste a picture of their teacher in the center box. 

 I'm sure you'll think of something that will be just perfect for their teacher. :)


For Personal Use Only
If you'd like to feature these subway art prints (thanks a bunch if you do!) you are welcome to use either of the images, but please don't post the prints on your blog.  I takes a lot of time to design them and I like to keep them here. Thanks. :)

The black and white prints can be printed onto colored paper or scrapbook paper.


For more color options, Click here for a tutorial on how to recolor the subway art prints.

To download: You must first click on the image to open it in a new window in it's highest resolution. Right click on the image and either copy and paste it into a document (to size and then print), or click on save image as to save it to your computer. You will need to size it before you print.
To size the prints: The prints look will look the best printed as an 8x8 or 8x10, or at 4"x4" or 4"x5" (for cards), but can be stretched to other sizes if you insert them into a document using a program like Microsoft Word/Publisher or Photo shop. Insert the image, click on it, then drag the sides of the image to the size that you want. 


You can print them on white or colored card stock, scrapbook paper, or (for the best quality) on photo paper. (Check your dollar store for photo paper, I found a package of 8- 8x10 sheets for $1.)

Today's Fabulous Find...Subway Art for A+ Teachers


I'm linking up to parties at these fantastic blogs, take a look!
Click here to see the party buttons.

Tatortots and Jello  The Creative Crate    Be Different Act Normal
Creation Corner    Serenity Now    Home Is Where My Story Begins    Funky Junk Interiors
Just A Girl    Finding Fabulous    Fingerprints On The Fridge    Chic on a Shoestring    The Shabby Nest
Creations by Kara    Beyond The Picket Fence    House of Hepworths   The Shabby Chic Cottage
Sew Much Ado   Blue Cricket Design    The Thrifty Home    Someday Crafts    Seven Thirty Three
I Love Naptime    All Thingz Related   Domestically Speaking    My Backyard Eden    Fireflies and Jellybeans
Centsational Girl    Under The Table and Dreaming    Embellishing Life    Sew Can Do   It's Fun To Craft
Ladybug Blessings    Tip Junkie    Today's Creative Blog    Skip to my Lou     Mad in Crafts
Making the World Cuter    Dittle Dattle    The Girl Creative    Sugar Bee Crafts
Pin It!

4.22.2011

Never Judge a Tray by It's Color (Before and After)

I've been busy designing a couple of subway art prints for teacher appreciation week, but haven't quite finished them yet...so meanwhile...take a look at this tray that I picked up at a thrift store for $1.50.  


A couple coats of black spray paint later (and a bit of distressing), here it is again.
 
 
It never ceases to amaze me what just a little bit of black spray paint can do!
 
It's pretty much being used as a catch-all tray until I decide what I want to put in it.  For now it has a few random items--an .88 clearance candle, a dollar store tin bucket, and some small shells we picked up while on a family trip last summer.  Total cost:  Under $5.
 
Today's Fabulous Find...The Magic of Black Spray Paint
 
  Enjoy your Friday!


Pin It!

4.19.2011

Featuring: Easter Subway Art on Tile and Table Decor

I was so excited to see this next project in my inbox.   It's something that I've wanted to try doing, but just didn't ever get around to it.  Cheryl H. took the Easter subway art print, cut it out in vinyl, and put it on a tile.  I love it!


I asked if she would mind sharing with you just how she did it. 
This is what Cheryl said she did:
1. I converted the image to an SVG file using Inkscape.
2. I cut the image on my Cricut Expression using the SCAL (Sure Cuts A Lot) program.
3. I use transfer tape to transfer the image to a 12" tile.

To insure that it doesn't come off, I use outdoor vinyl. Unfortunately, it is harder to work with.
 
 
 Here's the same subway art print, but used in a whole other way:


I was just as excited when I was invited to click over to Billime Party of four to see how Kelly used the Easter subway art in her darling table display.  This little bunny it too sweet! 


Thanks Ladies for sharing your fabulous ideas!

If you've used the Easter or Spring Subway Art prints we'd love to see your ideas!  Just leave a link to your post in the comments, so we can come check it out.

 
 Today's Fabulous Finds...How to Make a Subway Art Tile
and  Easter Table Decor
 

Pin It!

4.18.2011

A Few Fabulous Finds

With Easter coming, I thought I'd remind you about the free printable vintage paper dolls I featured  awhile back. They could be fun additions to a girls Easter basket.  There are sooo many choices!


Have you seen the cute bunny tail printable at Eighteen 25?  So cute!  They have a couple of variations.


The other day I saw these 72 hours kits that Missy put together for her kids at How Does She.  She included everything in her kits that her kids would need in an emergency.   You might want to check them out.  They could easily be adapted for adults as well.


Today's Fabulous Finds...Paper Dolls, Bunny Tails,
and 72 Hour Kits


Pin It!

4.15.2011

Easter Egg Hunt Vignette

Here comes Peter Cottontail,
Hoppin' down the bunny trail,
Hippity-hoppity,
Easter's on its way!

I thought it would be fun this year to put together a Peter Cottontail/Easter egg hunt themed vignette, while I still have children who are fascinated with the Easter Bunny!  There are hidden eggs in the vignette that can be moved around and hunted for....


...as well as Peter Cottontail himself, peeking out from the 'bushes' (after secretly hiding all of the eggs of course).


The Easter egg hunt stakes and bunny pick are from the dollar store as well as the butterfly (it was in with the flowers that I bought for the wreath).  I added three more bunches of flowers to the two that I already had in the wreath from my thrifty spring decor.  I poked the flowers in without any glue, so they can be changed easily.  I like to think of the wreath as a flowery meadow, perfect for hiding eggs in!


The candle was on clearance for .88, the ribbon was from the dollar store, and I already had the rick-rack.  I just taped it all to the candle in the back.


The plate and stand also came from the dollar store.  I made up the vinyl quote using my Silhouette program.  The fonts used are 'smiley monster' and 'oh photo shoot'.


The bunting is pieced from 30's reproduction fabrics and then zig-zagged onto warm and natural quilt batting.  What Easter egg hunt is complete without a banner?  You can read more about it here.


The basket is a .50 thrift find.  It was originally black, so I spray painted it Krylon's Bahama Sea.  The reindeer moss is from the dollar store, and the eggs were 40% off at JoAnn's, making them around $4. 


When you put together a wall grouping for children, it's a good idea to kneel down and check out their view of it.  This is what my youngest child sees when he hunts for the eggs (it's great counting practice too).


For more details on the framed shelf, paint stick crate, candlestick, wreath, bird's nest, shelf, and paint stick window, click here

 Here comes Peter Cottontail,
Hoppin' down the bunny trail,
Hippity-Hoppity,
Happy Easter Day!


 Today's Fabulous Find...Easter Egg Hunt Vignette


I'm entering the CSI Easter Challenge.
 

Visit thecsiproject.com

Linking up here, to see the linky party buttons, click on 'parties I link to' in the menu.
Pin It!

4.14.2011

A Bunting and a Blunder

The other day I had this idea to use some 30's reproduction fabric scraps, that I had, to make an Easter bunting. 

I made a pattern (from a cereal box) and then spent most of the afternoon choosing fabrics and pairing them together, cutting, pressing, sewing, and pressing some more, and that was all just to piece the triangles.


(To finish them I zig-zagged over the fabric onto warm and natural quilt batting,
trimmed the batting to 1/4", overlapped them, and sewed them together.)
 
 
I was only half finished with the bunting when my husband came home from work.  Excited about how it was going so far, I showed him the unfinished bunting, that was pinned together and hanging from the shelf, and then casually asked..."so what do you think?"  Well...this is what he (kindly) said..."it looks like you slapped a bumper sticker on a Lamborghini, I don't like it (and then he paused and added)...at all."  Wow!  I wasn't expecting that one!  lol!  Bumper sticker on a Lamborghini?  Generally he has no opinion when it comes to decorating (he's a smart man), so seeing that I was a bit taken back, he reminded me that I asked.  Yes, I did...I did ask.

(Now, by sharing this I'm in no way trying to imply that I think my vignette is of Lamborghini quality, I'm way more realistic than that!)


So what did I do?  I chose to focus on the back-handed compliment my husband gave me (the reference to the Lamborghini) and finished the bunting, and yes, I went ahead and hung it up too!   What did he know...right? 

Well...turns out he knows a lot more than what I give him credit for!  I realized later that I kind of forgot to mention to him that it was an Easter decoration (it was the first thing up), he assumed I was going to hang it from my spring vignette year round...oops!  How was he supposed to know, right?  :)

 Today's Fabulous Find...Bunting for Easter, Birthdays,
or...why not, just hang it up year round! :)

Pin It!

LinkWithin

Related Posts with Thumbnails